Tuesday, April 22, 2014

My first Card-In-A-Box! With retiring stamp set Tag It.

Pin It Now! I've seen so many beautiful versions of this seemingly complicated Card In A Box lately, and finally gave it a try!  After watching a video tutorial by Angie at MyChicNScratch, it looked a whole lot less intimidating. I pretty much CASEd her cute version of a box of balloons, changing out the papers and sentiments. This will go out to my dear friends grandfather, who will undergo brain surgery this week. 

I added an extra punch balloon to the underside of one of the flaps to decorate the closed backside. 
Isn't that little iguana from Tag It cute?!  It is soon to retire, and we'll be introduced to a new Ronald McDonald House fundraising set. 
I like this type of card for hospital patients, as it will sit upright at a bedside table and not fall over. I have a feeling ill be making lots of these!  


Monday, April 21, 2014

Hello! I must be going! Fun with retiring stamps {HSS184}

Pin It Now! I spent a portion of my morning going through all my stamps sets and marking my retiring stamps.  It's always bittersweet.  Is it silly to feel an attachment to stamp sets?  This fun fringe card was made with two retiring sets - Storybook Friends and Happy Day.
The layout of the card is from our latest sketch challenge at Hand Stamped Sentiments.  I flipped the sketch, and took the liberty of leaving it upside down so that you can see how "right on" I was!  Haha. You are welcome to turn it back upright for your card, or sideways if that floats yer boat.
If you haven't tried using Stampin' Up!'s Fringe Scissors, you absolutely must!  They are SO fun and easy to use.  What a great dimensional effect, and it gives the card an ombre look with the graduated shades of pink.
Here are a few tips on creating an ombre fringe card:
1)  It looks best if the card base is long ways, i.e. opens from the bottom and not the side.
2) The strip of cardstock I used to layer this card are 4-1/4" x 1-1/2", and scored at 1" to mark where to stop cutting with the fringe scissors.
3)  It helps to open the scissors wide to make your cuts, and not to cut until the scissors close.  This prevents unnecessary twisting and tearing of the cardstock. 
4) The fringe cuts in the scissors seem to be spaced so that your 4-1/4" pieces will have perfectly spaced fringes, right up to both ends!  Neat!
I was tempted to color the little critters with an aqua painter, but let it go black and white, like an old cartoon.  
If you decide you can't live without Storybook Friends, there's time to order it before it's gone!  Contact me today to order!  Happy Day, too - available while supplies last!  Below are links to the retired lists.
SUPPLY LIST:
STAMPS:  Storybook Friends, Happy Day
INK:  Versamark, Black Stampin' Emboss Powder
PAPER:  Subtles DSP Stack, Pink Pirouette, Blushing Bride, Strawberry Slush, Pistachio Pudding, Whisper White
EMBELLISHMENTS:  White Organza Ribbon
PUNCHES:  1-1/4" circle, 1-1/2" circle
TOOLS:  Fringe Scissors
  
PS:  Here are a couple of the cards I made with Storybook Friends last year!


If you plan to place an order, here is a HOSTESS CODE for your convenience!  TPQAW6RB

Have a blessed and creative day!

It's RETIREMENT season! Plus FREE SHIPPING this week! Oh, and a GIVEAWAY!

Pin It Now!
I always have mixed feelings about Stampin' Up! retirement time.  I LOVE new stamps and the excitement that comes before the new catty launch, but I have to have old friends (stamp sets, that is) leave.  

Here's our last chance to get a stamp set or accessories that we've had our eyes on before they're gone forever.  Here are the lists:


If you plan to place an order, here is a HOSTESS CODE for your convenience!  TPQAW6RB

ALSO!  Place an order this week with me, and not only will you get FREE shipping and a chance to be the hostess, but I'll be compiling my personal list of retiring stamps and will GIVE AWAY one of my personal retiring stamp sets.  

Email your order!  And stay tuned for the stack of stamps to choose from!

Friday, April 18, 2014

Easter Greetings & Treat Holders!

Pin It Now! I haven't had much time to post lately, but wanted to share a few of the Easter goodies I've made for friends & family.   I've been working behind the scenes to create more often, so here's a recap of this month's projects!

Here's a funny little punch art bunny.  I love this bunny with his tail end sticking up!  
The Stampin' Up! owl dressed as a bunny!  The bunny idea was a find on Pinterest, and the banner was added for a little more celebration!  
I loved this bunny card, it's clean and simple.  Uses the fabulous Hardwood background stamp, Eggstra Spectacular Easter set from the 2014 Spring Mini, and a little layering and glittering (note the glittered bunny tail!).  I knocked out a bunch of these in no time!
The Easter cross card!  I love this retired Crosses of Hope set.  It looks SO wonderful as a cross for Easter.  Layered with Deco Label Framelits, the new Petite Petals punch (2014 Spring Mini but WILL carry over to the 2014-2015 catalog), and Bird Builder Punch for the leaves.  The sentiment is stamped on vellum & hand cut into a banner strip.
I have to make some more of these little bunny houses this weekend!  They are SO fun!  They are cased from here. Using Milk Carton Bigz XL die, Hardwood, Elegant Butterflies Sizzlits, Bird Builder, and 1-3/8" Circle Punch.  
These Tag Topper Punch treat holders have been all around the web this year.  Created with the Tag Topper Punch (spring 2014).  My boxes measure 2" x 8" - punch both ends, score the bottom, and stick a little treat to the inside.  Then decorate as you wish! 

Mine are all gone by this point, but my stampin' friend Kathy made these for a class and I'm borrowing her pic.  Thx, Kathy!
Finally, my bunny bags!  I sent these to my downline and my mom.  They loved this little handcrafted muslin sack!  The chocolate bunnies are stamped on fabric, stitched onto scraps of old sheets, and stuck on a muslin sack.
If you have any questions about any of these projects, please feel free to shoot me an email or ask in the comments section.

Have a Blessed Easter, everyone!  xoxo


Monday, April 7, 2014

Wonderful Mother - Mother's Day Card with Spiral Flower Die

Pin It Now! 
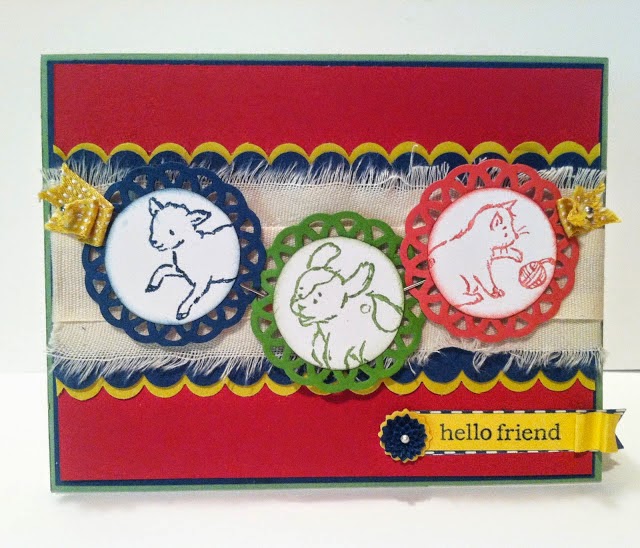
Spring is finally in swing!  I'm thinking ahead to Mother's Day, and bringing the sunshine indoors with this fresh color combo at Hand Stamped Sentiments...Coastal Cabana, Gumball Green, and Crushed Curry.

Do you ever make a card that requires you to tear into every corner of your craft room?  This is one of those!  I loved making it, but it took me 'round the crafty world, so to speak. Big Shot - Glue Gun (blistered thumb) - sewing machine in the far corner - heat embossing drawer - the punches - oh, and the box of SU goodies that was laying on the floor waiting to be unpacked!
The Originals Spiral Flower Die makes every card it sits on EXTRA special.  And that's what my mother-in-law is, so this will be headed her way next month.  Core'dinations makes these flowers so much easier to work with.  You can really grubby this cardstock up and it doesn't tear!  
Inside, a cluster of flowers from Simple Stems.  I have made a habit of adding a layer to the inside of my cards to strengthen it  and give a little more depth.  
I'm using our color combo at HSS, but also I'm playing along with Pal's Paper Arts.  Click the pics below to visit the sites for plenty of inspiration!

By the way, the sketch for this card is something I grabbed from page 99 of the Idea Book.  Different elements, but great looking layout!

SUPPLIES:
STAMPS:  Chalk Talk, Delightful Dozen, Simple Stems, Blessings From Heaven
INK:  Versamark with clear Stampin' Emboss, Coastal Cabana, Gumball Green, Black Staz On
PAPER:  Afternoon Picnic DSP, Gumball Green, Coastal Cabana Core'dinations, Whisper White, Crushed Curry
EMBELLISHMENTS:  Basic Pearls, stitching
BIG SHOT:  Originals Spiral Flower die, Secret Garden Framelits, Chalk Talk Framelits, Tasteful Trim
PUNCHES:  Scallop Oval